Peptide Starter Kit: What Supplies You Need, What Needle Size to Use, and How to Mix Your First Vial
You ordered your peptides. Now what? Before you touch that vial, here's everything you actually need to get started safely and avoid wasting product.
If you've been lurking on Reddit or peptide forums, you've probably seen conflicting advice about supplies, reconstitution, and injection technique. This guide cuts through the noise and gives you a practical checklist, from someone who's been through the process, so you can start your first protocol with confidence.
The Essential Supplies Checklist
These are the non-negotiables. You need every item on this list before your first reconstitution.
Bacteriostatic Water (BAC Water)
This is the water you'll use to reconstitute your lyophilized (freeze-dried) peptide powder. BAC water contains 0.9% benzyl alcohol, which acts as a preservative and prevents bacterial growth in your vial over multiple uses.
Why not sterile water? Sterile water has no preservative. Once you puncture the vial, bacteria can grow. If you're drawing from the same vial over days or weeks (which you will be), you need the antimicrobial protection that BAC water provides.
Buy pharmaceutical-grade. Hospira (manufactured by Pfizer) is the industry standard. Purchase from a pharmacy or verified medical supplier. Generic BAC water from Amazon has a track record of failed sterility tests and documented contamination cases. Your peptides are only as clean as the water you mix them with.
Insulin Syringes
Any standard insulin syringe from a pharmacy will work. They're all in the 29-31 gauge range with short needles designed for subcutaneous use. Just grab a box of 0.5 mL or 1 mL syringes. That's it.
Why they're perfect for peptides:
- Fine gauge means minimal pain. Most people barely feel the needle.
- Short needle is the right depth for subcutaneous injections.
- Unit markings let you measure precise doses. Once you know your concentration, you just count units.
Buy in bulk. A box of 100 is typically under $15. You'll go through them quickly if you're dosing daily.
Alcohol Swabs
Standard 70% isopropyl alcohol swabs. Use one to wipe the vial stopper before every draw, and a fresh one on your injection site before every injection. Non-negotiable hygiene step.
Sharps Container
Every used needle goes into a sharps container. You can buy a purpose-built one for a few dollars, or use any rigid, puncture-proof container with a secure lid (like a thick plastic laundry detergent bottle). Never throw loose needles in the trash.
Nice-to-Have Extras
None of these are required, but they make the process smoother, especially once you're running multiple compounds.
Mixing Syringes (18-22 Gauge)
A larger-gauge needle makes drawing BAC water from the vial and transferring it to your peptide vial much faster. The thicker needle moves liquid quickly. You only use these for reconstitution, not injection. Optional but convenient.
Syringe Filters (0.22μm PES)
Some users filter their reconstituted solution through a 0.22μm PES (polyethersulfone) syringe filter as an extra sterility step. This is more common with research-grade peptides from less established sources. If you're using pharmaceutical-grade product, filtering isn't necessary, but it's a practice you'll see discussed in the community.
Vial Labels
Once you're running two or three compounds, you need a system for labeling vials with the compound name, reconstitution date, and concentration. A piece of tape and a marker works fine. Some people in the community use a Niimbot label printer for clean, water-resistant labels. Overkill for one vial, genuinely useful when you're managing several.
Small Fridge Container
A small opaque box or Tupperware on a shelf in your regular refrigerator keeps vials upright, organized, and away from light. You don't need a separate mini fridge. Any container that blocks light and keeps things from rolling around works perfectly.
Reconstitution 101
Reconstitution is the process of adding BAC water to your lyophilized peptide powder to create an injectable solution at a known concentration. It sounds technical, but it's straightforward once you've done it once.
The Basic Process
- Choose how much BAC water to add. Most peptide vials have a 3 mL capacity, so that's the maximum you can add. Common choices are 1 mL or 2 mL. The more water you add, the more diluted the solution, which makes it easier to measure small doses precisely. Use our reconstitution calculator to figure out the exact concentration for your dose.
- Wipe both vial stoppers with alcohol swabs
- Draw the BAC water into a syringe
- Inject the water into the peptide vial slowly, aiming at the glass wall
- Let it dissolve, then refrigerate
Quick Reference
| Vial Size | BAC Water | Concentration |
|---|---|---|
| 5 mg | 2 mL | 250 mcg per 10 units |
| 10 mg | 2 mL | 500 mcg per 10 units |
For exact calculations with any vial size and dose, use the peptide reconstitution calculator. For a full step-by-step walkthrough, check out the reconstitution guide.
Technique Tips
When adding BAC water to the vial, aim the stream at the inside glass wall rather than directly on the powder cake. Swirl gently to mix rather than shaking. These are best practices for clean dissolution, though most peptides are more resilient than people think. You're not going to destroy your peptide by being slightly imperfect here.
Dissolution Time
Some peptides dissolve almost instantly. Others, especially larger or more hydrophobic peptides, can take 10-15 minutes to fully dissolve. Don't panic if it doesn't go clear right away.
What "cloudy" means: Slight haziness that clears within a few minutes is normal. Persistent cloudiness, visible particles, or discoloration after 30 minutes at room temperature could indicate degradation, contamination, or a solubility issue. Don't inject a solution that doesn't look right.
Your First Injection: What to Expect
If you've never self-injected before, this is probably the part you're most nervous about. That's completely normal. Here's what to expect.
It's Subcutaneous, Not Intramuscular
Peptide injections are subcutaneous, meaning the needle goes into the fat layer just beneath the skin surface, using a short needle at a shallow angle. This is the simplest type of injection. You're not going deep into muscle. The insulin syringe needle is short and thin, inserting maybe half an inch at most.
Common Injection Sites
- Lower abdomen: The most popular site. Pinch a fold of skin 2+ inches from the navel, inject at a 45-degree angle.
- Upper thigh: Good alternative, especially if you're rotating sites.
The Pinch-and-Inject Technique
- Clean the site with an alcohol swab
- Pinch a fold of skin between your thumb and forefinger
- Insert the needle at a 45-degree angle
- Push the plunger slowly and steadily
- Release the skin, withdraw the needle
Managing Injection Anxiety
The anticipation is worse than the actual injection. With a 29-31 gauge needle, most people describe it as less painful than a mosquito bite. Some don't feel it at all. It gets easier every time.
What's Normal After
A small red dot at the injection site is completely normal. Occasional minor bruising happens, especially when you're new. What's not normal: significant swelling, heat radiating from the site, or redness that spreads. If that happens, stop injecting and consult a healthcare professional.
Storage Rules
Proper storage is the difference between a peptide that works and one you've wasted money on. Keep it simple:
| Form | Storage | Duration |
|---|---|---|
| Lyophilized (powder) | Freezer (long-term) or fridge (weeks/months) | Months to years |
| Reconstituted (liquid) | Refrigerator only (2-8°C / 36-46°F) | ~28 days (follow label) |
Key rules:
- Never freeze reconstituted peptides. Freeze-thaw cycles damage the peptide structure.
- Track the reconstitution date. Log it in a tracker app so you always know when each vial expires. Regimen lets you record reconstitution dates and automatically tracks expiry for each vial. Labeling the physical vial is a good backup habit too.
- Keep vials away from light. Inside a box or drawer in the fridge is ideal.
Setting Up Your Tracking System
Start tracking from day one. This sounds like extra work, but it saves you from guessing later. Here's why it matters:
- Reconstitution dates create expiry clocks. When did you mix that vial? Is it still good? If you didn't write it down, you're guessing.
- Dose history helps you assess what's working. If you adjust your dose at week 3 and feel better at week 5, you want that data.
- Logging how you feel reveals patterns. Side effects, energy levels, recovery speed. Over weeks, the trends tell a story that day-to-day impressions miss.
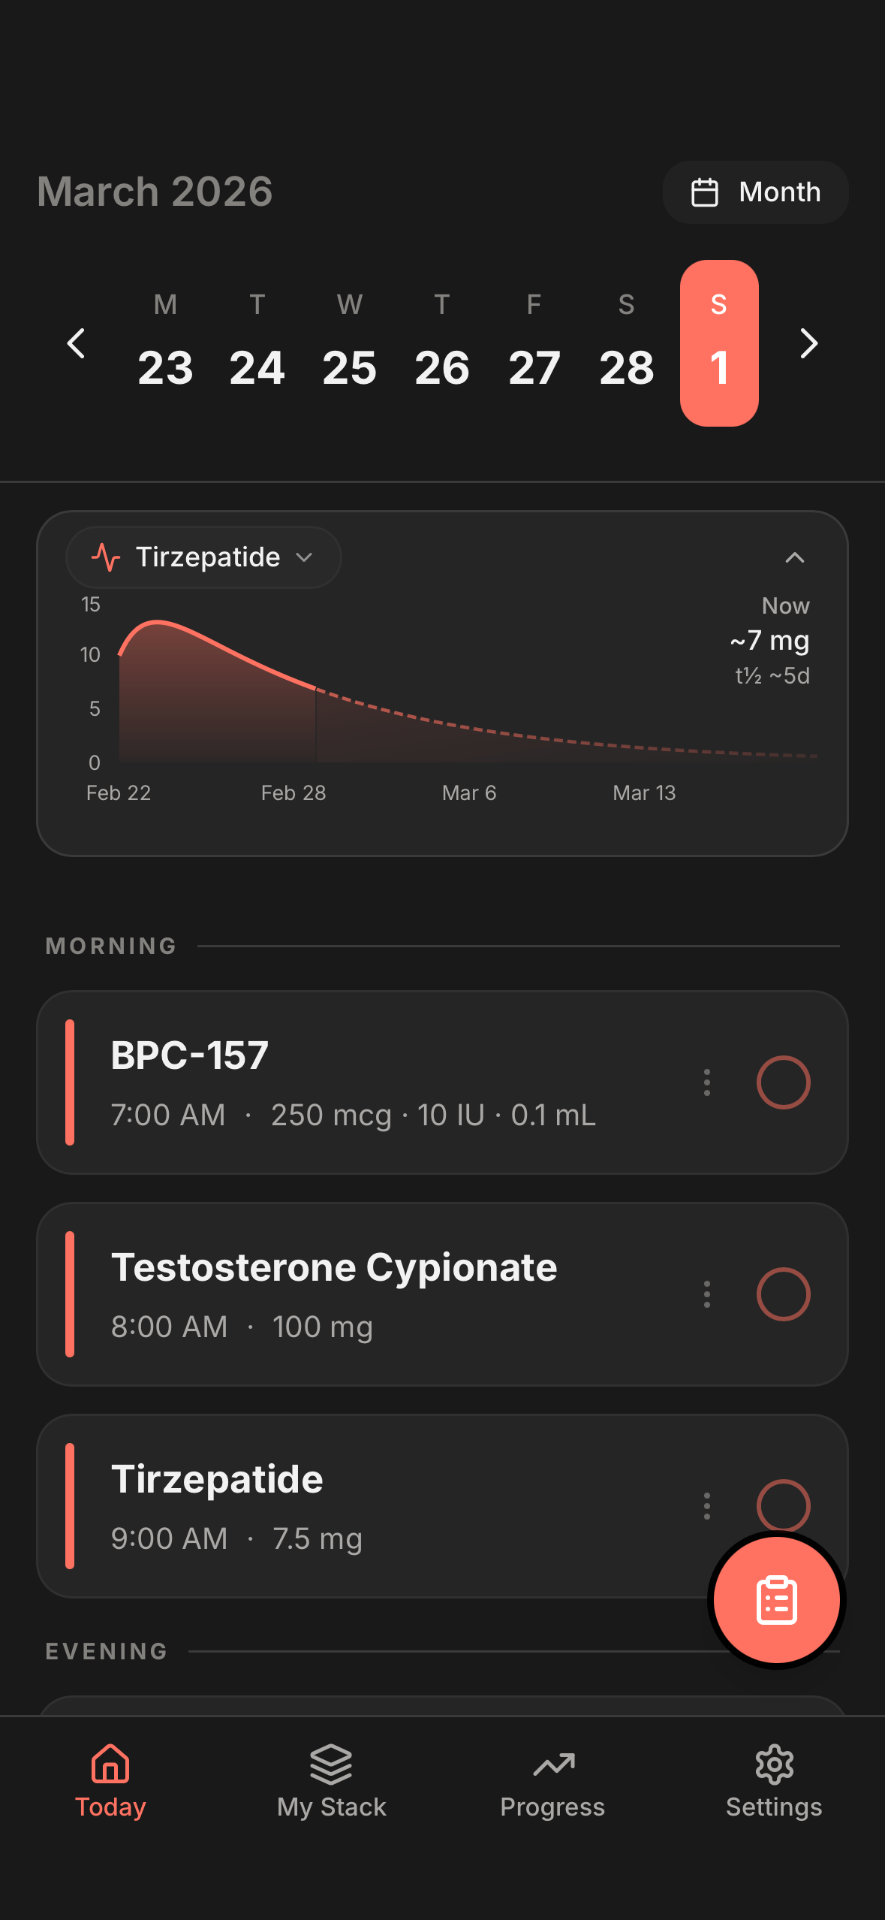
Regimen handles all of this in one place: a built-in reconstitution calculator, schedule reminders so you don't miss doses, medication level curves that show you what's in your system, and progress tracking to monitor your results over time.
Track your peptide protocol
Reconstitution calculator, dose tracking, schedule reminders, and medication level curves. Everything you need for your first peptide cycle.
- Built-in reconstitution calculator
- Smart injection reminders
- Medication level curves
- Private, secure health data
Complete Peptide Protocol Checklist
Running a peptide protocol involves four distinct steps. Each one has its own guide on this site. Use this checklist to make sure you haven't skipped anything — from reconstitution to injection to tracking.
Add bacteriostatic water to your lyophilized vial at the right ratio for your target dose. Use our reconstitution calculator to get exact syringe units, or read the full reconstitution walkthrough.
Dose and frequency depend on the compound. BPC-157 is typically 250mcg 1-2x daily; TB-500 is 2-2.5mg twice weekly. For GLP-1 peptides, follow your titration schedule. See compound-specific guides: BPC-157 + TB-500 stack, GLP-1 dosing guide.
Use a 29-31 gauge insulin syringe. Rotate between 4-6 sites: lower abdomen (left/right), upper thighs (left/right), love handles, and upper glutes. Read the injection sites guide with body map for detailed technique and rotation strategy.
Log doses, reconstitution dates, injection sites, and how you feel. Regimen handles dose reminders, reconstitution calculations, medication level curves, and site rotation in one app.
SubQ vs intramuscular for peptides: Almost all peptides are injected subcutaneously (into fat), not intramuscularly (into muscle). SubQ uses shorter, thinner needles, is less painful, and provides systemic absorption. The only common exception is some BPC-157 protocols where users inject near an injury site — even then, it's still subcutaneous, just localized. If your peptide protocol calls for "IM," double-check with your provider.
Common Beginner Mistakes
These come up constantly in forums. Save yourself the trouble:
- Not tracking reconstitution date. Five weeks later you're staring at a vial wondering if it's still good. Log it in a tracker app like Regimen the moment you reconstitute, so you never have to guess.
- Using the same injection site every time. Rotate between left and right abdomen, thighs, and other sites. Repeated injections in the same spot cause scar tissue buildup and can reduce absorption over time.
- Starting multiple compounds at once. If you start BPC-157, TB-500, and GHK-Cu all in the same week, you have no idea which one is helping (or causing a side effect). Start with one compound, establish a baseline, then add more.
- Not giving it enough time. Most peptide protocols need 4-6+ weeks to show meaningful results. Don't quit after two weeks because you don't feel different yet.
- Storing reconstituted vials improperly. Room temperature, in sunlight, or in the freezer. All bad. Reconstituted peptides live in the fridge, period.
Frequently Asked Questions
What supplies do I need to inject peptides?
At minimum: pharmaceutical-grade bacteriostatic water (Hospira/Pfizer is the standard), insulin syringes (29-31 gauge), alcohol swabs, and a sharps container. Optional extras include mixing syringes for reconstitution and syringe filters for additional sterility.
What size syringe should I use for peptide injections?
Use 29-31 gauge insulin syringes in 0.5mL or 1mL sizes. The fine gauge minimizes pain, the short needle is appropriate for subcutaneous depth, and the unit markings allow for precise dosing.
Can I use sterile water instead of bacteriostatic water for peptides?
Only if you plan to use the entire vial in a single injection. For multi-dose vials (which is almost always the case), you need bacteriostatic water. The 0.9% benzyl alcohol preservative prevents bacterial growth each time you puncture the stopper.
How do I store peptides after reconstitution?
Reconstituted peptides must be refrigerated at 2-8°C (36-46°F). Never freeze reconstituted peptides. Keep vials away from direct light and use within the timeframe on the label, typically around 28 days. Track the reconstitution date.
Does injecting peptides hurt?
Most people describe subcutaneous peptide injections with insulin syringes (29-31 gauge) as nearly painless. The needle is extremely thin and short. The anticipation is almost always worse than the actual injection. It gets easier with practice.
What does it mean if my reconstituted peptide is cloudy?
Slight haziness that clears within a few minutes is normal for some peptides. However, persistent cloudiness, visible particles, or discoloration after 30 minutes at room temperature could indicate degradation or contamination. Don't inject a solution that doesn't look right.
How do I keep track of my peptide protocol?
Log every dose, track reconstitution dates (they create expiry clocks), and note how you feel day to day. A dedicated tracker like Regimen handles dose logging, schedule reminders, reconstitution calculations, and medication level curves in one place. Consistent tracking is how you know whether your protocol is actually working.
How do I reconstitute peptides, calculate doses, choose injection sites, and set up a dosing schedule?
It's a four-step process: (1) reconstitute your lyophilized peptide with bacteriostatic water at the right ratio — use a reconstitution calculator to get exact syringe units; (2) follow compound-specific dosing — BPC-157 is typically 250mcg 1-2x daily, TB-500 is 2-2.5mg twice weekly; (3) inject subcutaneously using a 29-31g insulin syringe, rotating between 4-6 sites (abdomen, thighs, love handles); (4) track your doses, reconstitution dates, and how you feel in a dedicated app like Regimen. See our injection sites guide and reconstitution walkthrough for detailed instructions.
Should I inject peptides subcutaneously or intramuscularly?
Almost all peptides are injected subcutaneously (into fat, not muscle). SubQ injections use short, thin insulin needles (29-31 gauge), are nearly painless, and provide systemic absorption. Common sites are the lower abdomen, upper thighs, love handles, and upper glutes. Intramuscular injection is rarely needed for peptides. Even BPC-157 protocols that target a specific injury site still use subcutaneous injection — the peptide is absorbed systemically regardless of location.
Related Tools and Guides
Peptide Reconstitution Calculator
Calculate exact doses for any vial size and concentration.
Peptide Tracker
Track doses, schedules, and progress for any peptide protocol.
Reconstitution Step-by-Step Guide
Full walkthrough of reconstitution math and technique.
BPC-157 + TB-500 Recovery Stack
Dosing, timing, and what to expect from the most popular peptide stack.
Complete Peptide Tracking Guide
How to manage multi-compound protocols, cycling, and dose changes.
BPC-157 Tracker
Dedicated tracking for BPC-157 protocols and dosing.
Disclaimer: This article is for informational purposes only and does not constitute medical advice. Peptides discussed here may not be approved for human use in your jurisdiction. Always consult with a qualified healthcare provider before starting any new supplement or injection protocol. Individual results vary, and proper medical supervision is recommended.
Ready to track your protocol?
- Smart reminders so you never miss a dose
- Track weight, photos, and progress over time
- Medication level curves for every compound